

How To Draw A Cylinder In Powerpoint
In a previous blog I showed y'all how to create a shiny sphere which you tin use in a multifariousness of means. This time, I will show yous how to create a transparent tube/cylinder.
Go to the INSERT tab and click on SHAPES. From the window that appears, click on the DONUT.

Selection out the donut
Draw a perfectly round DONUT by holding downward the SHIFT key as you click and elevate.
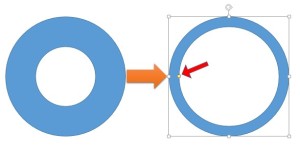
Resize the walls of your donut
The DONUT band is quite thick and we need to reduce this a bit so we finish up with the paradigm on the right (higher up). To do this, click and drag the yellow grab handle towards the outside of the DONUT.
We will get-go with a basic cylinder for now, but I will evidence you how to add something inside the cylinder a bit farther on.
Right click on your DONUT and select FORMAT SHAPE.
Select three-D ROTATION, and from the presets, and from the grouping called PERSPECTIVE, pick the ane called PERSPECTIVE RELAXED.
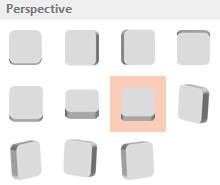
Perspective relaxed pick
You now get something like this…
" data-medium-file="https://excelmate.files.wordpress.com/2014/04/screenhunter_133-apr-06-19-29.jpg?w=300" data-large-file="https://excelmate.files.wordpress.com/2014/04/screenhunter_133-apr-06-19-29.jpg?w=331" class="size-medium wp-image-556" src="https://excelmate.files.wordpress.com/2014/04/screenhunter_133-apr-06-19-29.jpg?w=300&h=293" alt="A "relaxed" donut" width="300" height="293" srcset="https://excelmate.files.wordpress.com/2014/04/screenhunter_133-apr-06-19-29.jpg?w=300&h=293 300w, https://excelmate.files.wordpress.com/2014/04/screenhunter_133-apr-06-19-29.jpg?w=150&h=147 150w, https://excelmate.files.wordpress.com/2014/04/screenhunter_133-apr-06-19-29.jpg 331w" sizes="(max-width: 300px) 100vw, 300px">
A "relaxed" donut
You tin e'er change the perspective manually later to arrange your detail requirements, but this will practice for now.
At this stage we can add a fiddling interest to the shape by calculation a bevel, but it's not absolutely necessary. If we do though, nosotros exercise it by selecting the 3-D FORMAT selection and selecting one of the bevel options from the Meridian BEVEL push button. This volition give us…
" data-medium-file="https://excelmate.files.wordpress.com/2014/04/screenhunter_133-apr-06-19-35.jpg?w=262" data-large-file="https://excelmate.files.wordpress.com/2014/04/screenhunter_133-apr-06-19-35.jpg?w=262" class="size-full wp-image-557" src="https://excelmate.files.wordpress.com/2014/04/screenhunter_133-apr-06-19-35.jpg?w=480" alt=""Relaxed" donut with added top bevel" srcset="https://excelmate.files.wordpress.com/2014/04/screenhunter_133-apr-06-19-35.jpg 262w, https://excelmate.files.wordpress.com/2014/04/screenhunter_133-apr-06-19-35.jpg?w=137 137w" sizes="(max-width: 262px) 100vw, 262px">
"Relaxed" donut with added superlative bevel
Now we need to add some depth to our shape. Amongst the 3-D FORMAT options you'll see DEPTH. Pick a colour so information technology matches with what will be the pinnacle of our cylinder and type in a value to requite some depth to the DONUT. In this example I volition set up it to 250 pt.
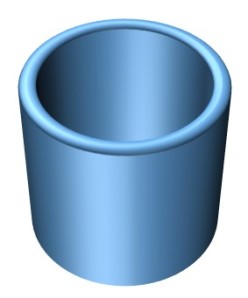
Donut turned into a cylinder
Try out the unlike MATERIAL and LIGHTING options available to y'all as well as the ANGLE of the low-cal to run into a diversity of different effects.
Using some of the material and lighting options
At this bespeak y'all are thinking "well…that'southward pretty…but what practise I do with information technology?"
This is where having something in the cylinder might be of use. For instance you might want to represent profit levels, or levels of readiness for a project and want something a little more interesting than just 50% written across the screen.
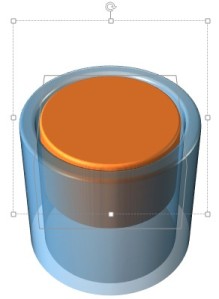
Commencement off exactly as we did before to create the empty cylinder but this fourth dimension add in a coloured Circle inside the DONUT. Once you've done that, Grouping the two shapes together. Proceed as above calculation bevels and depth to the grouped shape. You lot should now accept something similar this…
" data-medium-file="https://excelmate.files.wordpress.com/2014/04/screenhunter_133-apr-06-19-53.jpg?w=240" data-large-file="https://excelmate.files.wordpress.com/2014/04/screenhunter_133-apr-06-19-53.jpg?w=265" class="size-medium wp-image-561" src="https://excelmate.files.wordpress.com/2014/04/screenhunter_133-apr-06-19-53.jpg?w=240&h=300" alt="Cylinder with 2filling"" width="240" height="300" srcset="https://excelmate.files.wordpress.com/2014/04/screenhunter_133-apr-06-19-53.jpg?w=240&h=300 240w, https://excelmate.files.wordpress.com/2014/04/screenhunter_133-apr-06-19-53.jpg?w=120&h=150 120w, https://excelmate.files.wordpress.com/2014/04/screenhunter_133-apr-06-19-53.jpg 265w" sizes="(max-width: 240px) 100vw, 240px">
Cylinder with "filling"
At the moment our contents "fill" the cylinder. Nosotros can adjust this level to whatever we desire to give the impression of different values i.due east. 75%, l% etc.
Click TWICE (non a double click) to select the "filling". Modify the DEPTH to any level you want to show. Here, I will set it to 125 pt (or 50% of the full cylinder).
Filling adjusted to 50%
Trouble is, the DEPTH varies starting from the top, not the bottom which would make more sense. To lower the "filling" become to 3-D ROTATION and become to the setting Distance FROM Ground. Enter a NEGATIVE value until y'all hit the lesser of the cylinder.
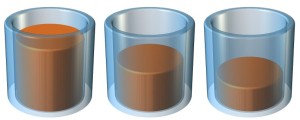
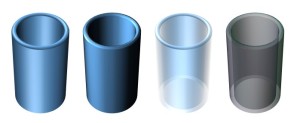
Three transparent cylinders showing three unlike fill up levels
Apply different values to your "filling" to correspond unlike values as I accept done in the case above. I have also changed the perspective slightly to give a improve view of the levels in each cylinder.
So with a few simple techniques yous can create your own custom iii-D shapes that stand for your information in a more visually interesting way than just a handful of bullets with numbers, and you don't have to get and buy some random stock photo that doesn't actually bear witness what you desire the way y'all imagined information technology.

Source: https://excelmate.wordpress.com/2014/04/06/powerpoint-3-d-custom-shapes-cylinders/
Posted by: spencereaccon1998.blogspot.com
0 Response to "How To Draw A Cylinder In Powerpoint"
Post a Comment